


This story is part of Cookin’ with Ice, a special series laying out everything a planet-conscious cook needs to know to prepare delicious and sustainable meals right out of cold storage.
We’ve walked through what to cook and prep for the freezer, and how to ensure that even icy vittles stay appetizing. But that’s all for nothing if your chilly appliance is a mysterious black hole of distant food memories. Once arranged for maximum visibility and convenience, however, your freezer will make it easier to eat deliciously and with way less waste.
We’ve developed a system that works for any type of freezer—upper, lower, or side—that includes what to stow, how to stow it, and how to arrange the space for its ultimate retrieval and enjoyment.
What to stow
We cram a lot into our freezers. In addition to ice and that bottle of Tito’s, most of them hold a jumble of store-bought frozen foodstuffs: ice cream and waffles, burritos, pizzas, packages of plant-based proteins, and bags of berries and baby peas. Then there’s the stuff you chucked in to stave off spoilage: the breads, the broths, the takeout rice, the cubed block of tofu, the leftovers, the scraps for stock and compost. But there are also the half-used things that would once have ended up buried in the crisper drawer at the end of a recipe—like half-shallots, a few orphaned mushrooms, or the last cloves of garlic. Those extra bits are much more likely to live on as fillings for an omelet, toppings on a pizza, additions to a stir-fry, or enhancements to a curry if you chop them and put them on ice right away.
How to stow it
In order to have these elements come out of cold storage ready to use, they have to go in prepped and properly packed. “My freezer is almost like a filing cabinet of ingredients,” says Kate Hall, who founded the company The Full Freezer to help people make better use of these oft underused appliances. Hall advocates freezing pretty much everything, but everything is a lot of stuff. If a magical, well-organized cupboard of frozen curiosities sounds like a stretch, don’t worry: We’ve boiled it down to six steps to get it set up—and fit more into your freezer than you thought possible.
Make things smaller. Separate bulky foods into portions you’ll use, which will save space and time spent defrosting. Losing the boxes when food is individually wrapped also cuts down on the bulk.
Contain. The best storage vessels are the ones you already own—as long as they’re clean and airtight. Freezer bags can be reused, and sturdy deli or takeout containers are usually fine.
Create regular shapes. It’s easier to stack and sort things when sizes are consistent. This is why freezing flat in bags is ideal for soups, stews, and sauces. It’s also why using ice cube trays is a kick-ass way to chill any number of ingredients like broth, tomato paste, and chopped herbs—the roster of prepped and ready-to-cook foods we like to call “freeze en place.”
Label, label, label. Convinced that when the time comes, you’ll be able to distinguish that veggie chili from the Cajun red beans? Trust us, you won’t. Label everything with permanent marker, either on a strip of tape or right onto the baggie or container. Also note the date, and consider adding the quantity.
Compartmentalize. Carve up space in your freezer wherever you can, even within existing shelves or drawers. “I’ve got a shoe box in one, and a tin that a gift bottle of gin came in that’s holding all my herbs,” Hall says. For vertical storage of anything you froze flat, try putting old magazine holders to good use.
Inventory. Keep a list of what’s in the deep freeze, so you’ll use it up before you buy more. A simple note taped to the door will do, but consider keeping an album of current freezer images on your phone, and deleting them as you use stuff up.
How to fit it all
Most of us have one of three types of freezer: upper, lower, or side. Each of these arrangements has its own nuances, and we’ve got schematics that optimize each, but first, a few universal truths:
Put meat—and anything else that can spread bacterial goo before it freezes or if there’s a power outage—on the bottom shelf.
Keep ice cream and other foods that are prone to melting or spoilage off the door, which is the warmest place in the box.
Organize according to what you use most, putting those items in the most accessible spots.
Top freezer
The content below was originally paywalled.
Most top freezers have two narrow shelves on the door, and a big one in the main compartment dividing top from bottom. Frozen baked goods, nuts, herbs, and ice packs fit nicely on the door, which is also the place for your compost bag and the one you use to collect scraps for making stock.
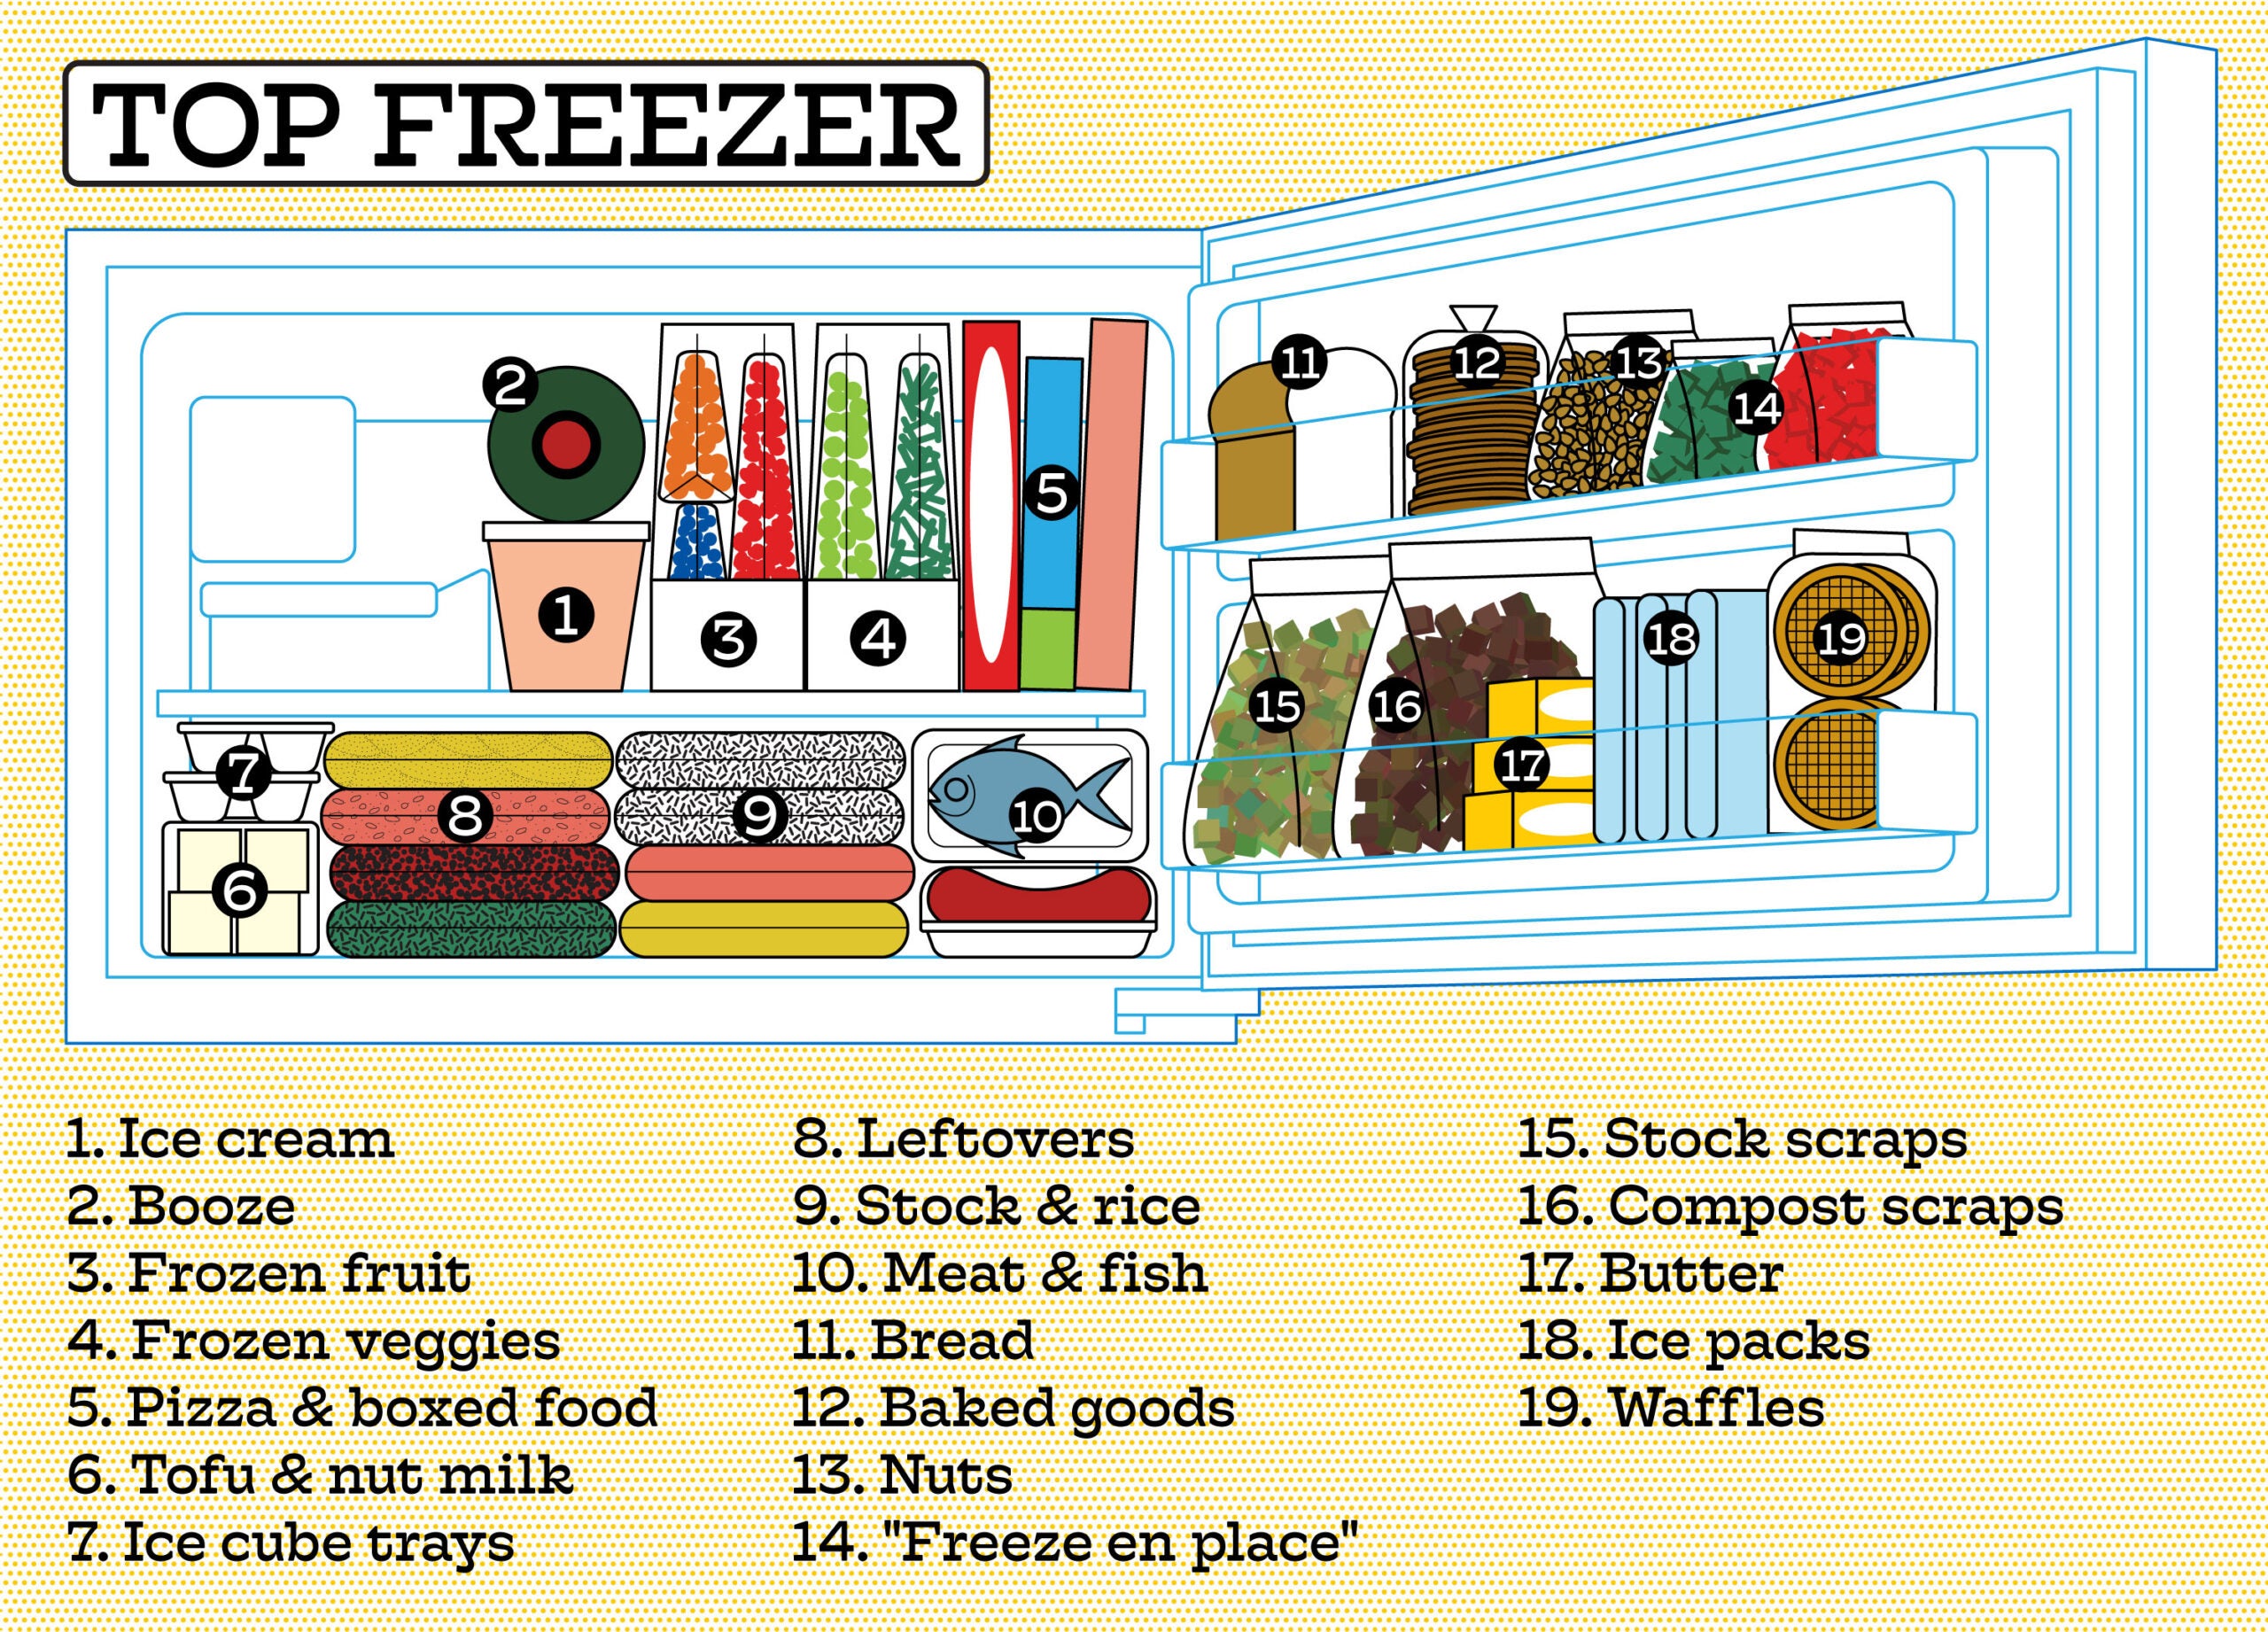
The top shelf of the main compartment is likely where your ice-maker lives, so it’s usually got plenty of headroom. It’s great for vertical storage of stuff like pizzas and other boxed foods, and for using magazine holders to organize frozen fruit and veg. Pints of ice cream form a solid base for a bottle of booze.
The lower shelf is for any meat or plant-based proteins like Impossible Burgers, along with leftovers and prepared meals. If you froze them flat, go ahead and stack ’em: You’ll be looking at them at eye level, so it’ll be easy enough to see what’s what. This is also the place for ice cube trays filled with your freeze en place.
Bottom freezer
Lowdown freezers are usually made up of two drawers. The lower level tends to be deep, meaning it’s prone to becoming an indistinguishable pile of you’re-not-sure-what. The trick here is to stash as much as possible upright, rather than in stacks.
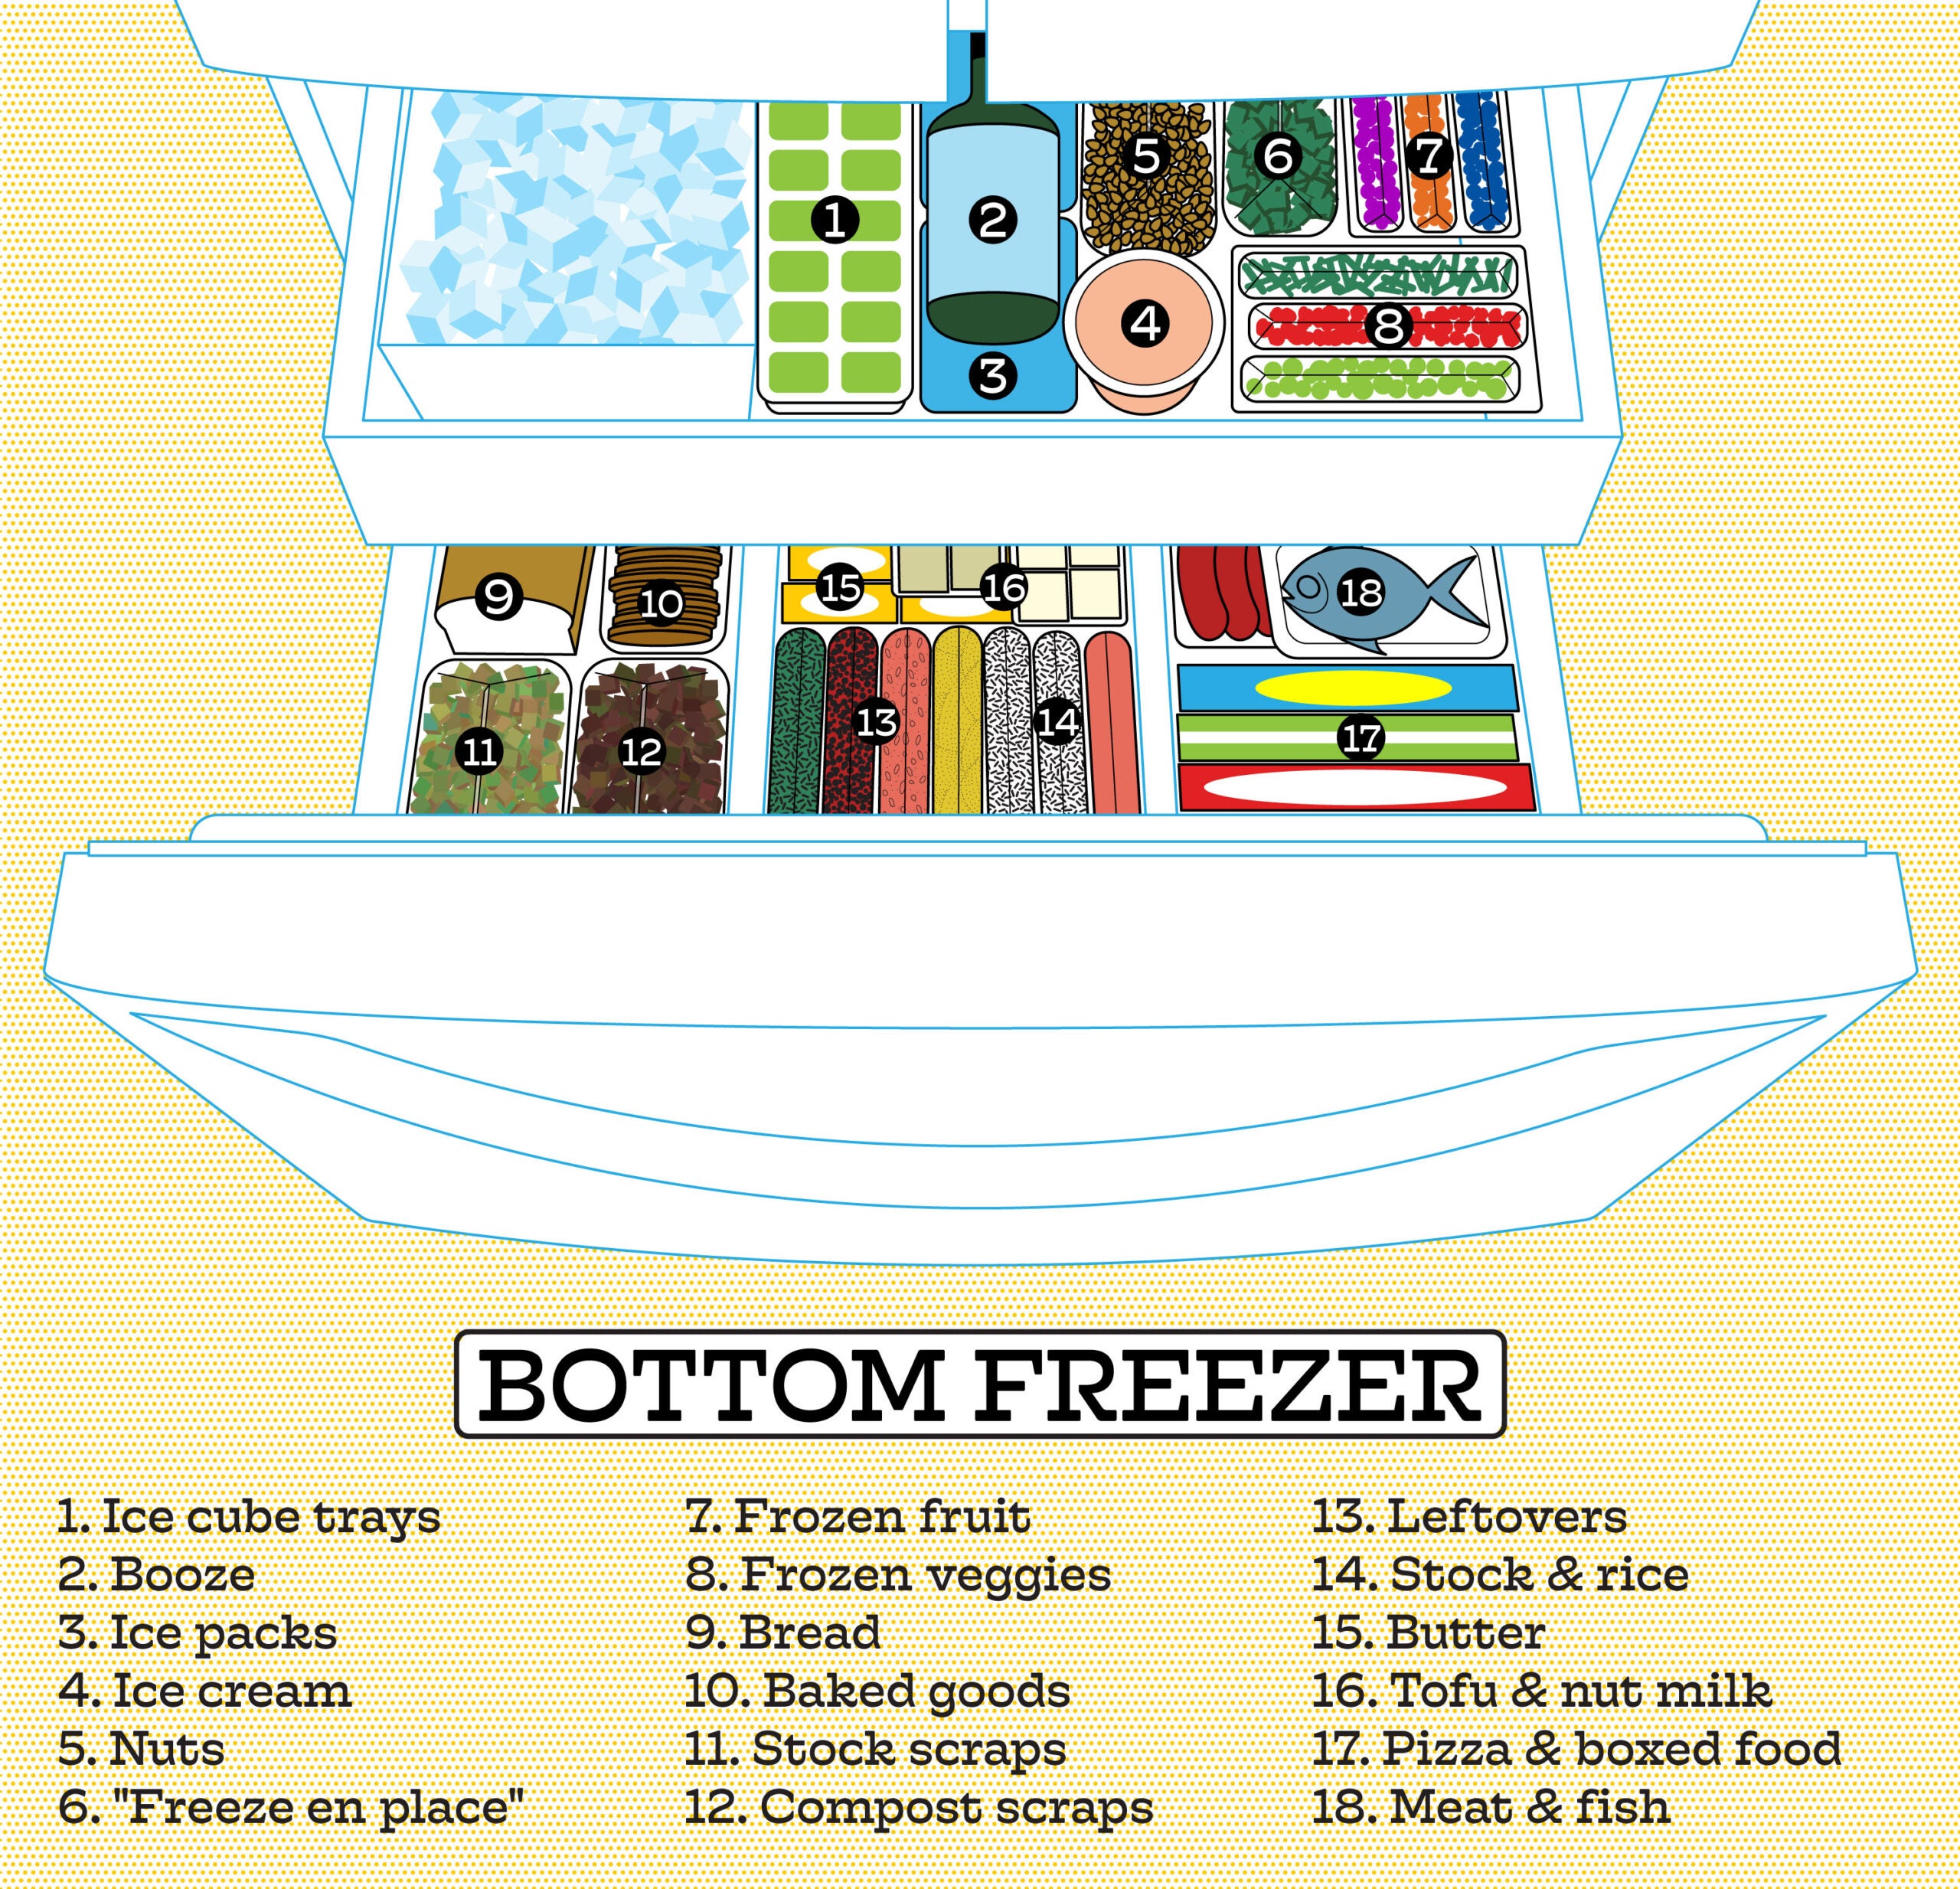
Stow pizzas and boxed meals vertically so you can look down at them as you would files in a filing cabinet. Any meat, fish, or plant-based proteins can live behind them. If this space isn’t already divided—or if it’s only split in half—add an extra barrier or two to separate leftovers and prepared meals from baked goods and those bags earmarked for stock scraps and compost.
With no door to stow stuff, you might lose a little space and so will need to use that upper level for things like ice packs, nuts, and baggies of frozen herbs and pestos and such. This is also where you’ll keep the hooch and Häagen-Dazs—alongside the ice-maker. A couple bins can help organize frozen fruits and veggies here too.
Side freezer
With tons of shelves on the door and inside, the side freezer is kind of the dream. The door to this one holds the stock and compost bags, bread, butter, nuts, and freeze en place. It’s also the place for the grown-up beverages.
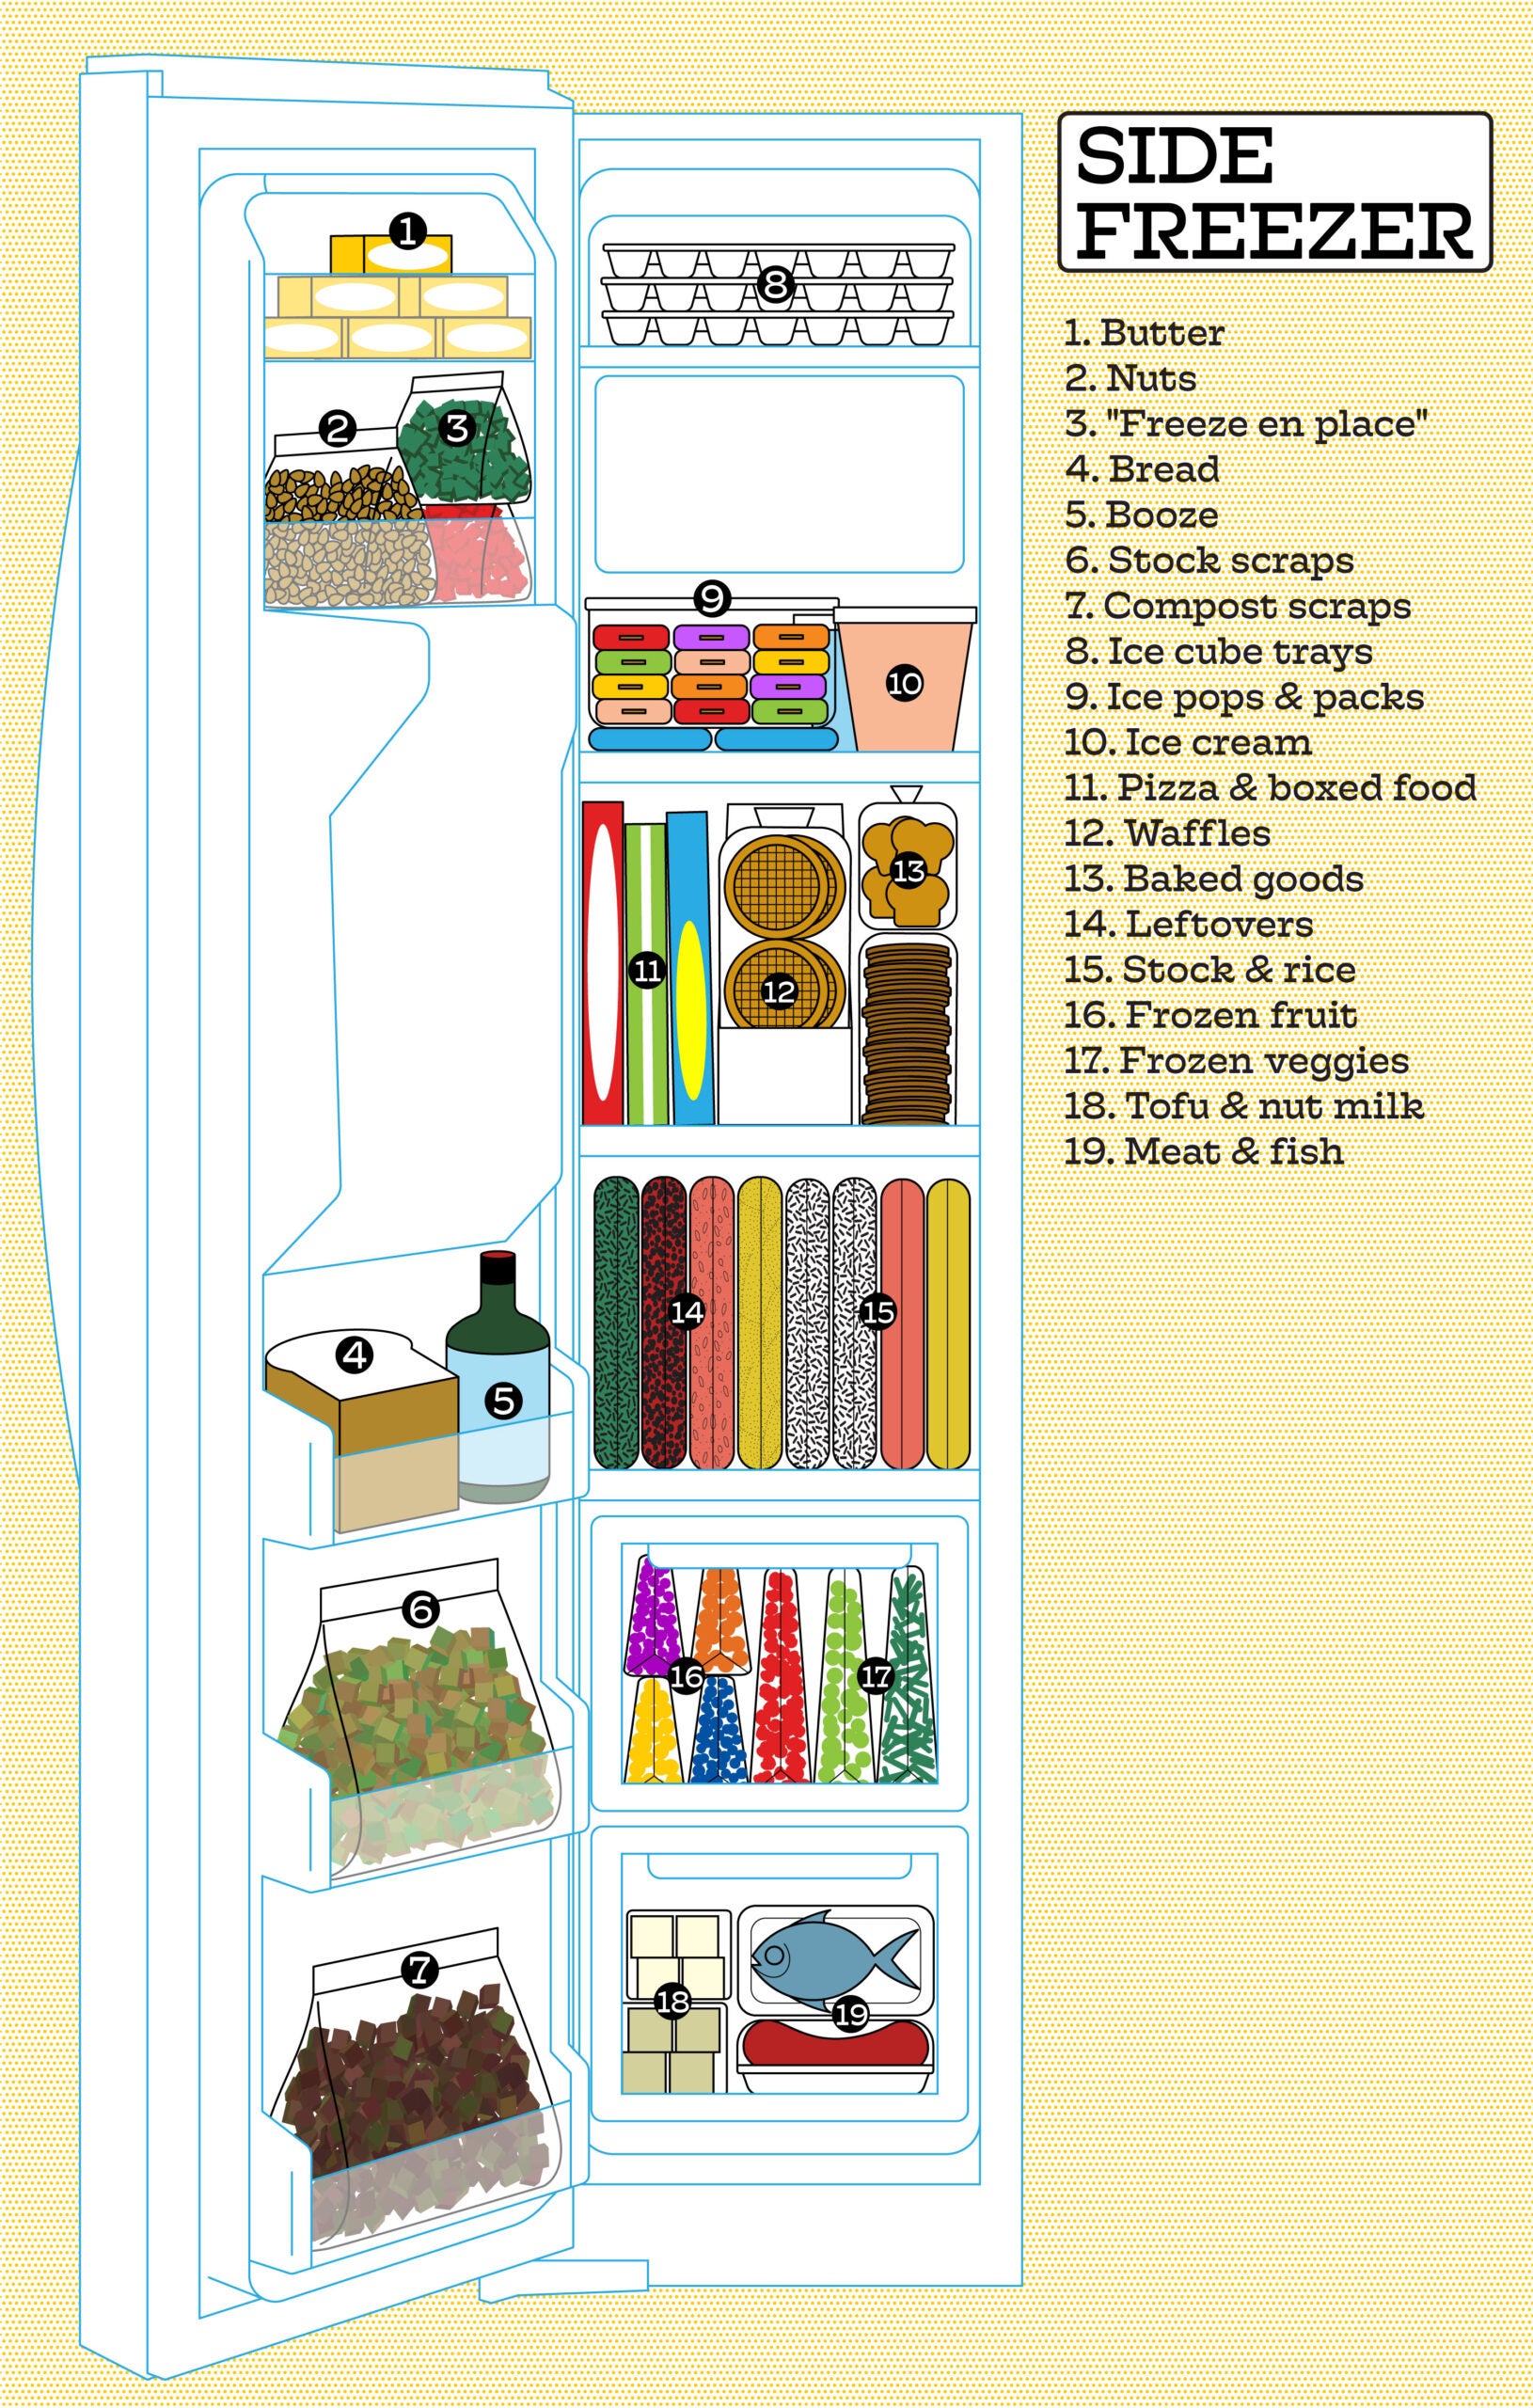
On inside shelves, which are probably adjustable, it’s easy to stow things vertically: pizzas and other boxed foods on one level, leftovers and prepared meals on another. In this fantasy freezer, frozen treats and ice packs can take up a whole shelf of their own, and you can fill the bottommost levels with frozen fruit and veg, tofu, and containers of nut milk. Just be sure to save the lowest down for the proteins.